
The Tone Claw might very well be the most significant development in the history of tremolo spring claws.
The common belief is that spring claws began life in Leo Fender’s mid-1950s tremolo system. Not much to it. A bent piece of metal for the purpose of giving the springs something to latch on to. The design perseveres among the many different tremolo systems that have come and gone.
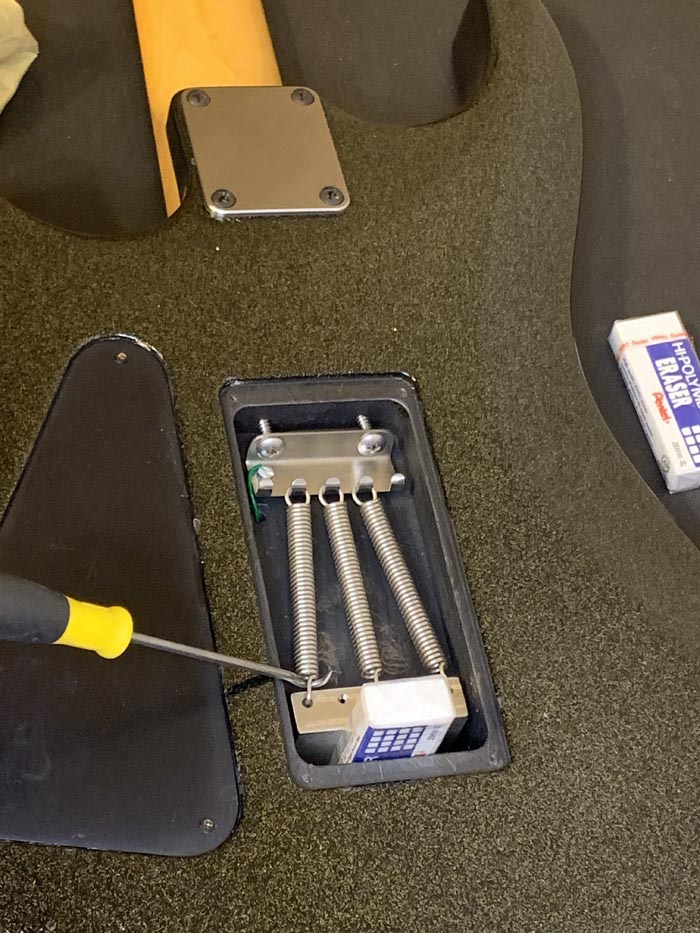
The underside of the tremolo cavity can be considered by some to be an area of opportunity. LOL! During heavy usage, the spring tension can loosen enough for slight shifting. That can lead to a few things. One is the loss of mechanical energy transference. Another is potential tuning issues.
Considering the material, a stock spring claw is average at best. Some are steel. Some are pot metal. The good people at Floyd Rose have been offering a brass tremolo claw for a while now. It comes with brass screws as part of the purchase and I suggest it as an option for anyone with a tremolo system.
Another bone of contention with some players is the physical limitations of the actual claw. It’s not all that significant in stature and literally weighs a fraction of an ounce. Every other thing you do for tone and sustain can come down to a bent piece of pot metal. HaHa!
Here is how AxLab’s Tone Claw turns those frowns upside-down:
Size
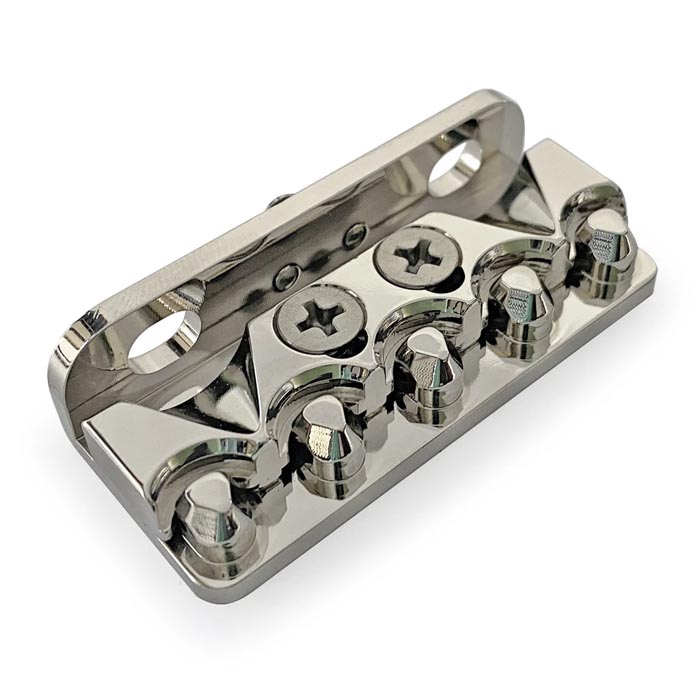
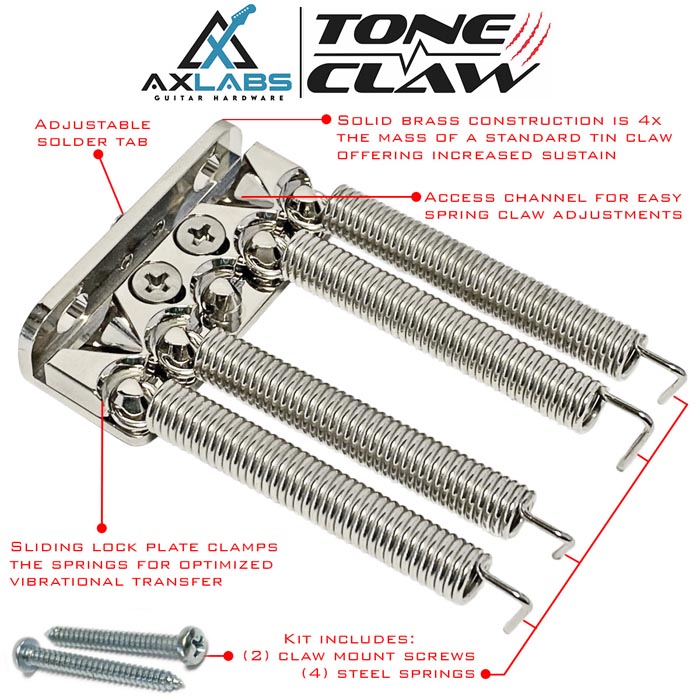
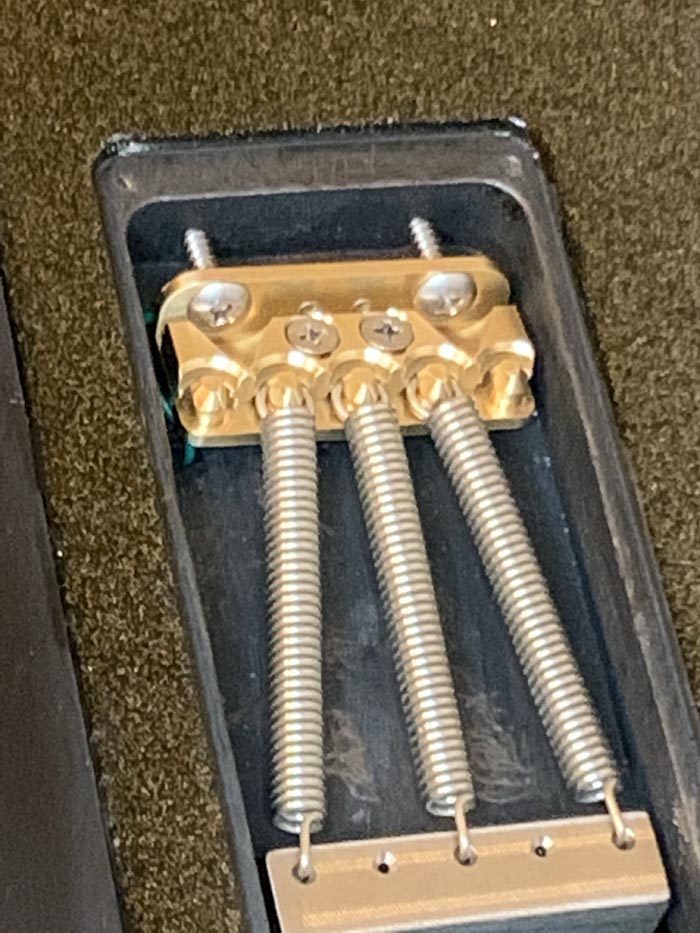
First and foremost, it’s massive. According to the scale, it weighs approximately 5x more than a stock steel or pot metal claw. It’s about 3x heavier than a standard brass tremolo claw. Even if you don’t use the locking feature, it’s a lot more “meat” to grab on to and hold the resonance going through the guitar.
Composition
It’s also brass. You can see the one available as bare brass. The other option is a nickel plating over brass. Brass is a particularly musical metal. It has an entire section in an orchestra! LOL! Plus, this is coming from Floyd Rose. They are the undisputed industry standard for tremolos and tremolo parts for over 40 years. You’re going to get a higher level of consistency and quality.
Locking System
And here’s the key feature of the Tone Claw: the locking system. That’s right! The nut and the saddles are no longer the only thing that locks! I have never seen anything quite like this before! Once your springs are in place, the top clamp plate comes in to play. This plate literally locks the spring hoops in place. That keeps the springs from shifting during use. Why’s that important?
If you get in to the wilder tremolo acrobatics of Vai or Dime or Gillis, you know the score! HaHa! Wank around on the bar while looking in the tremolo cavity. Be sure to pull up as well as push down! You should clearly see some relief in the spring tension, specifically when pulling up. And most likely some shifting of the spring hoops. You will also most likely see the hoops come loose from the hooks That shifting around can cost you some tone.
Locking the spring in to place on the claw is akin to locking your strings in to place at the nut and at the saddle.
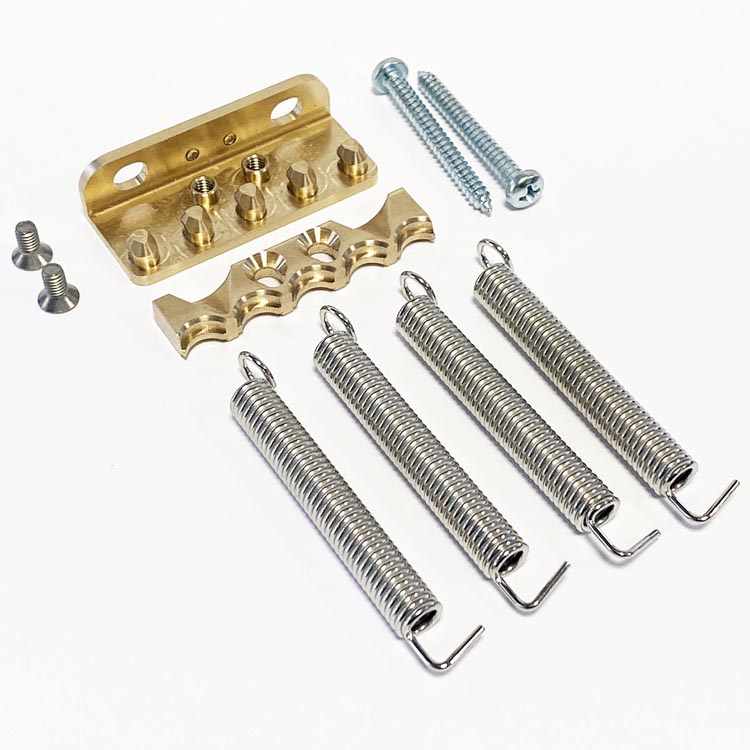
Installation is a snap. It comes with everything you need, including mounting screws and a full set of new springs. A super groovy feature is the grounding connection. It is now much more convenient to attach the ground wire! It’s also now out of the way and can orient easily for right or left-handed players.
Take a look at the handy install video:
Keep scrolling down further past the article for some handy and fun-filled tips from yours truly. LOL!
Personally, I have 3 (three!) Tone Claws on my guitars. What’s not to like? Easy installation. Instant results! Clearly-defined benefits! Pretty cut and dry!
The Tone Claw is a tremolo claw after all. That means it’s a replacement part to improve your tone on all the major spring-loaded tremolo systems. Fender, Floyd Rose, PRS, Ibanez, and so on. To get yours, order direct from Floyd Rose or from API.
AP International Website | Facebook | Twitter
Floyd Rose Website | Facebook | Twitter | YouTube
7 string 59 Alnico 2 Alnico 4 Alnico 5 Alnico 8 Bare Knuckle BKP Brass Brown Sound Celestion Ceramic Custom Shop Dean DiMarzio DMT EVH Fishman Floyd Rose Fluence Fretboard Gibson Humbucker Ibanez JB Jimmy Page John Petrucci Les Paul MJ Mojotone Nut P-90 PAF Pariah Pickup Professor Guitarism ReWind Satch Satriani Schaller Seymour Duncan Singlecoil Single Width Speaker Tech Tip
Darth’s Installation Tips
Disclaimer: These are only some simple techniques that I manage to pick up here and there. I do not consider them industry-wide best-practices, and they should not be seen as such. LOL! If you see something that helps you, that’s Kool & The Gang! If you have a better technique, that’s awesome too! Do not do anything that you are not comfortable with doing. Please seek the help of a qualified tech that you trust, if necessary.
Definitely read before starting. These are fairly broad strokes and a degree of mechanical common sense is going to be of benefit.
Suggested Tools
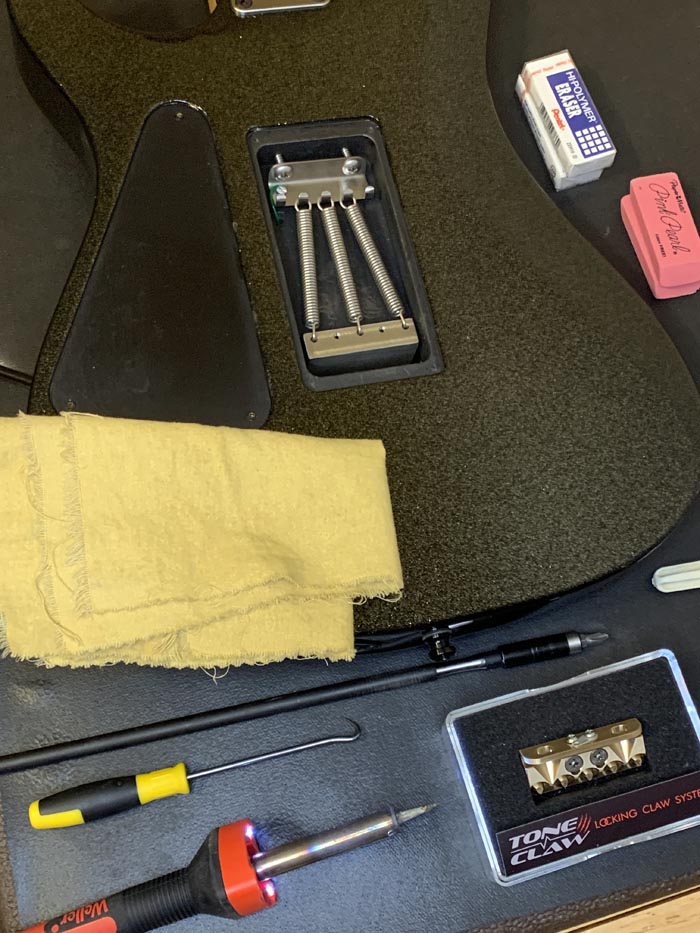
- Soldering Iron or Soldering Station
- Long Shaft Screwdriver (12″ suggested)
- Hook and Pick Set
- String Winder
- others, as detailed below
Removing Old Claw
Fire up the soldering iron, so it’s ready to go when you get to it.
Make note of the approximate placement of the current claw. Focus on the claw end, where the spring hoops connect. Probably won’t be perfect, but it can help reduce the time to dial it in later on.
I generally prefer loosening string tension and taking the pressure off the tremolo system. This is a personal preference. If you like to put some sort of block against the sustain block, that’s cool too. For the sake of this exhibition, I am putting that white block eraser behind the sustain block. It just makes it easier to see how it all works together. Either way, you should end up with the guitar face down and the tremolo cavity face up for the next step.
-
Hook Spring(s) -

Remove Spring(s)
Using a hook from the Hook and Pick set, remove the springs at the sustain block. You might find a “specialized” spring pulling tool for this. It’s over-priced poppycock. You can find a hook tool at the hardware store or Harbor Freight or wherever for much less. You may like to use some form of pliers to remove the springs. That’s groovy too.
-
Loosen Screws -

Old Claw Removed
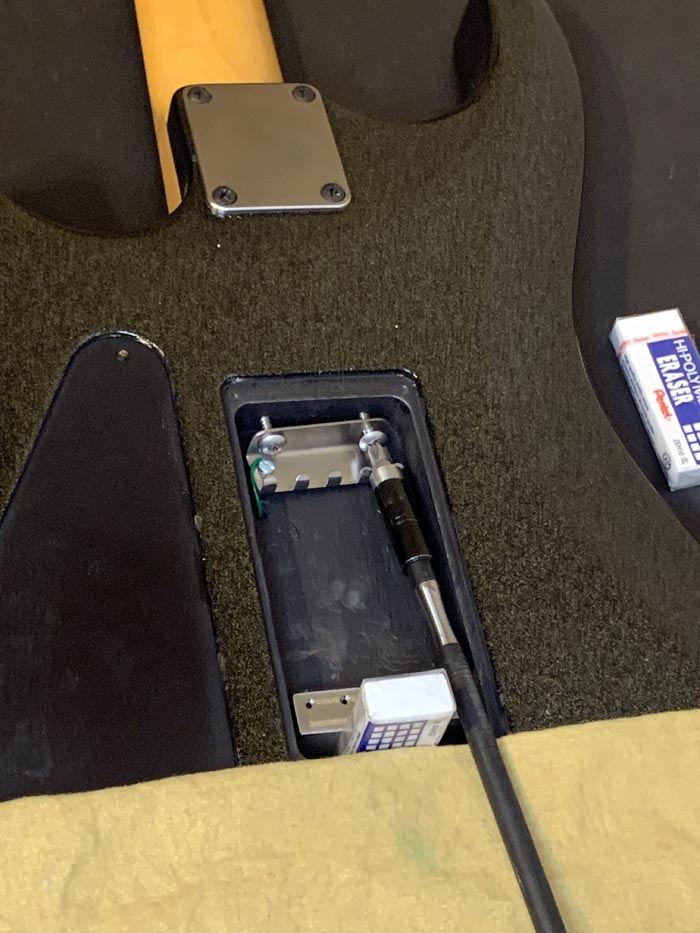
Using the long shaft screwdriver, remove the wood screws at the claw. I use a long screw driver so that I can keep a shallow angle on how those screws go in and out. On re-install, that keeps a lower profile so the claw doesn’t tilt up higher and risk poking out the back of the trem cavity. Note: put down something to protect the guitar’s finish where the driver may come in contact.
Remove the ground wire from the old claw. Use the soldering iron or just snip it off at the claw. Whatever works for your setup. Just leave plenty (or all!) of the wire.
Installing New Claw
Solder ground wire to new claw. Or maybe you like to do that once the new claw is in place. Or at some point in the middle. Doesn’t matter when, just don’t forget. HaHa!
-

New Ground Connection -
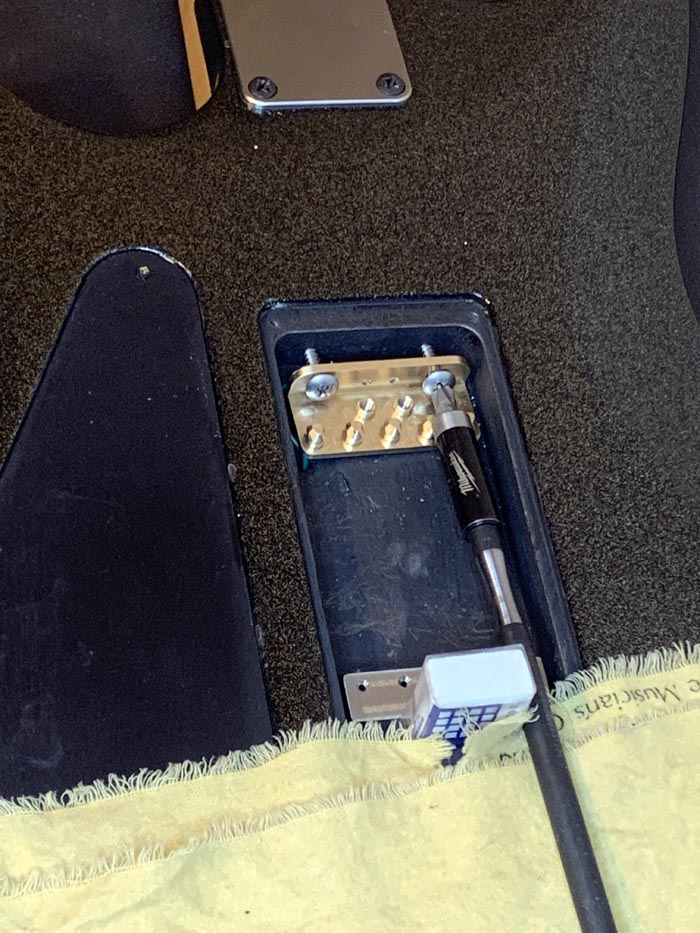
Screw in new Tone Claw
Back to the screwdriver. LOL! Why not a drill? The screwdriver lets you “feel” how the screws are going in. Also, I will apply wax to the screws first. Even if using the old screws. Especially if using the new ones. This is wood, after all. Taking the safer path can avoid costly repairs. Anyhoo… replace the wood screws until the new claw is at the approximate position of the old one.
-
Hook-In Springs -

Ready for Clamp Plate
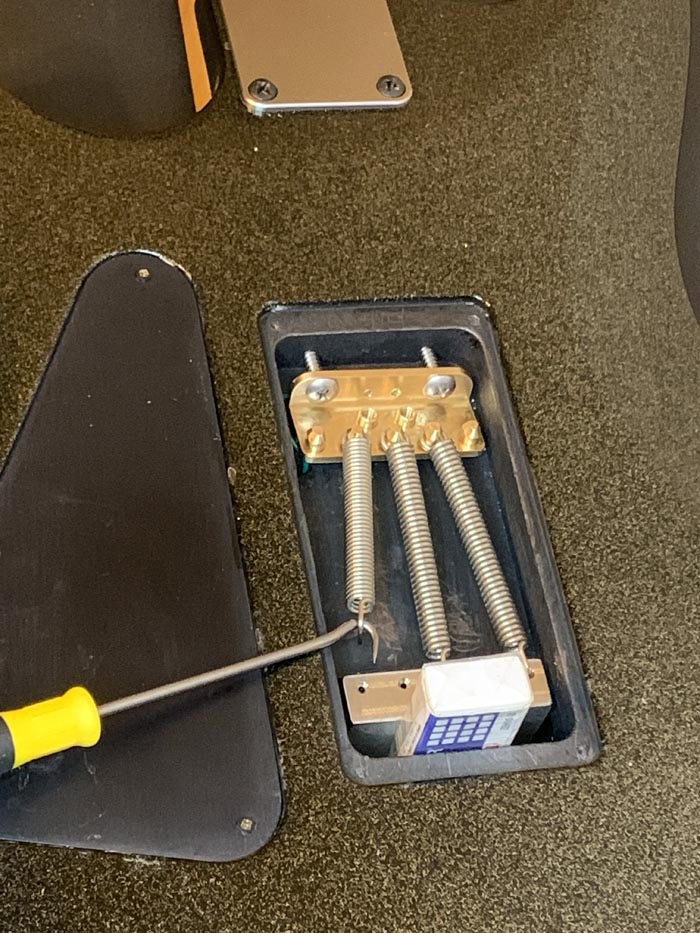
Replace the springs. AxLabs suggests fitting the hoop end first. From there, use the hook to stretch each spring out to the sustain block and push in to the respective hole.
How about that top clamp plate? Some might want to lock it down now. I like to take that step when closer to finishing up. Should be fine either way. Find what works best for you.
Tuning Up
If you choose to loosen the strings or to block the sustain block, here’s a step that I practice at this point. Flip the guitar face-up and block the underside of the trem beneath the fine tuners (if a Floyd Rose style system). This will protect the finish if the strings are too loose. Sure, there is a special over-priced gadget for this too. LOL! Personally, I have a selection of block erasers. You know, the old pink block pencil erasers. Just a few bucks and small enough to keep out of the way.
Now it’s time to tune up. When at pitch, see if your baseplate is level. If not, tighten or loosen the claw screws as needed and re-tune. Repeat until you are at your desired baseplate position. Floyd Rose suggests that the baseplate is level with the face of the guitar. But we know there can be variables here and there, so I’m not gonna tell you how to live your life! HaHa!
If you did not already tighten up that top clamp plate, definitely consider it now. This is where I would personally do so. I figure the major adjustments are complete and the hoops are in an ideal configuration at this point. Still, I don’t think there is a totally right or wrong way. Just what is best for you.
From there, nail your fine tuning and you’re ready to go.


